New players guide:
How to join game
January 21, 2022
Hello, Commander!
Reta Wars is a Play-to-Earn game where you can collect and command NFT heroes, participate in wars between nations, and earn RETA and GRT, the in-game currency as a reward. Winning the war will give you much more rewards, so mercenary skills and strategic determination to create a strong army are required.
P2E games using blockchain have been attracting a lot of attention recently, but some people may still find this difficult. Today we’re going to take a look at all the necessary information to help you get started with Reta Wars.
This will be especially helpful if this is your first time trying an NFT game.
How to Start Playing Reta Wars
For those who are new to playing P2E games and earning money, in this guide, you will learn how to send BUSD from Binance to Metamask.
STEP 1. Download Metamask Wallet
STEP 2. Adding a new network to Metamask
STEP 3. Transfer BUSD to Metamask
STEP 4. Invest NFT Heroes and Get Staking Profits
STEP 1. Download Metamask Wallet
In general, recommend that you search for Metamask in your Chrome extension and install it. Alternatively, you can go directly to the installation page via the link below: https://chrome.google.com/webstore/detail/metamask/nkbihfbeogaeaoehlefnkodbefgpgknn
Firstly, you need to open your MetaMask wallet by clicking on the MetaMask icon on the Chrome toolbar. After you’ve clicked on the MetaMask icon, enter your password to unlock your wallet.
STEP 2. Adding a new network to Metamask
After installation, Metamask is set to ETH Mainnet by default. To send BUSD or BNB from Binance to MetaMask, you must first add the Binance Smart Chain Network to MetaMask.
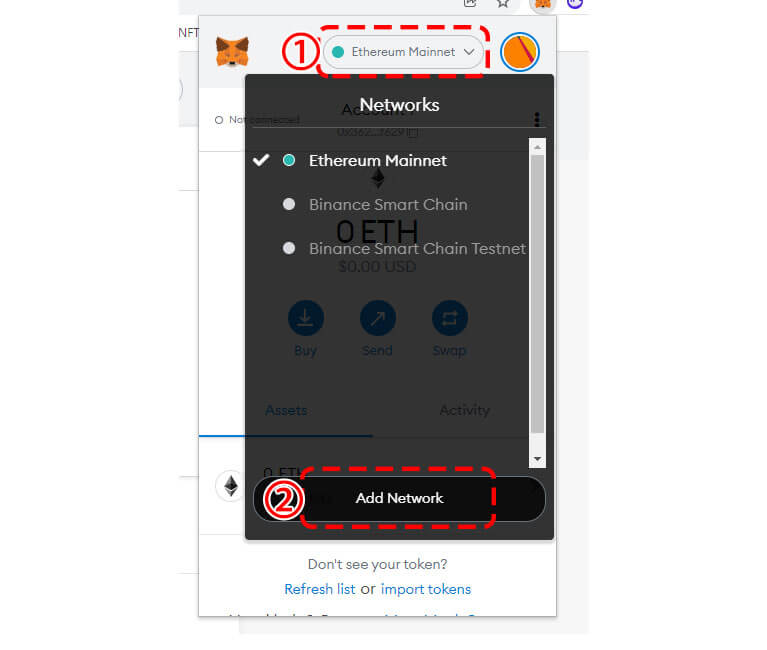
① Click “Ethereum Mainnet” to open the network list.
② Click “Add Network” to add a new network.
In the “Networks” page on MetaMask, you’ll see multiple fields. This includes “Network Name”, “New RPC URL”, “Chain ID”, “Currency Symbol”, and “Block Explorer URL”. Here’s what you need to write in the fields.
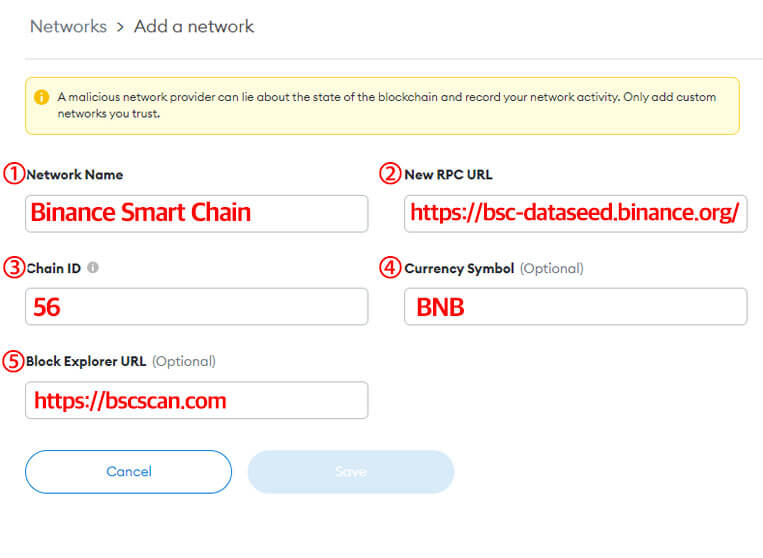
① “Binance Smart Chain” into the “Network Name” field.
② “https://bsc-dataseed.binance.org/” into the “New RPC URL”.
③ “56” into the “Chain ID” field.
④ “BNB” into the “Currency Symbol” field.
⑤ “https://bscscan.com” into the “Block Explorer URL” field.
After you’ve pasted the fields, you need to save your changes. Click on “Save” to add the “Smart Chain” network to MetaMask. You’ve successfully added the Binance Smart Chain network to MetaMask.
STEP 3. Transfer BUSD to Metamask
After you’ve added the Binance Smart Chain network to MetaMask, you’ll automatically connect to it. On the “Network” dropdown box, you’ll see that “Binance Smart Chain” is selected. This means that you’re on the Binance Smart Chain network.
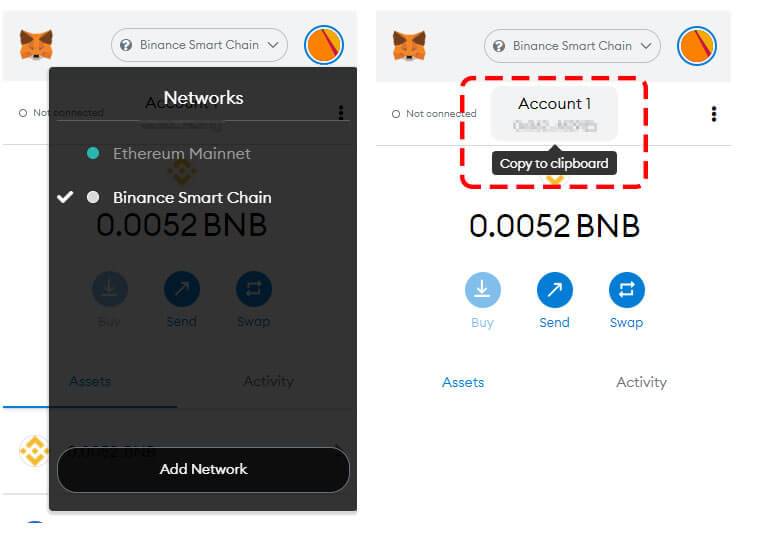
Now, you need to copy your BSC address. To do so, click on “Account 1” to copy your BSC address to your clipboard.
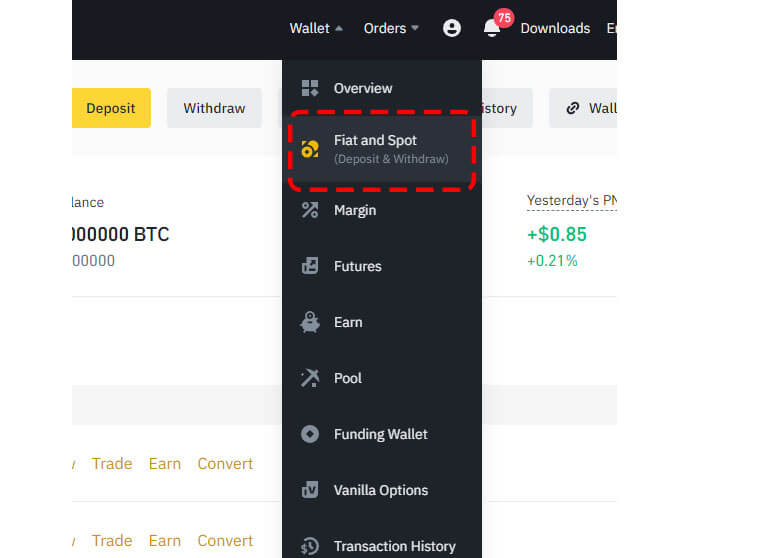
After you’ve copied your BSC address on MetaMask, you need to go to Binance and log in to your account. Once you’re on Binance, click on “Wallet” on the top navigation bar.
This will open a menu containing several options including “Overview”, “Fiat and Spot”, “P2P”, and others. Click on “Fiat and Spot” to go to your fiat and spot wallet.
Once you’re on your fiat and spot wallet, you’ll see a list of cryptocurrencies that you own and their balances.
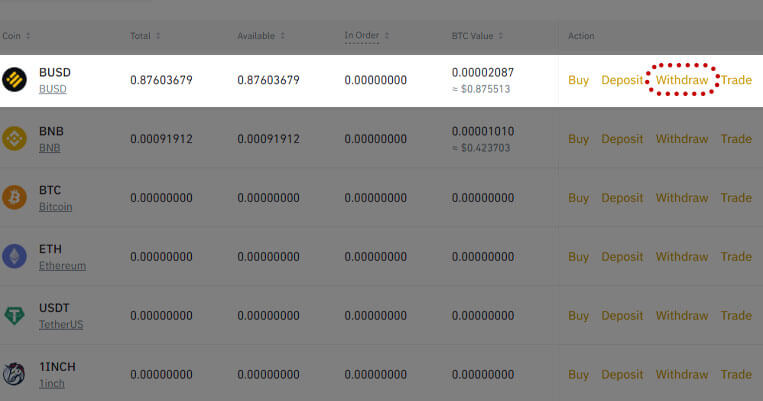
Find the list of currencies you want to transfer to Metamask in this list and click Withdraw to go to the withdrawal page.
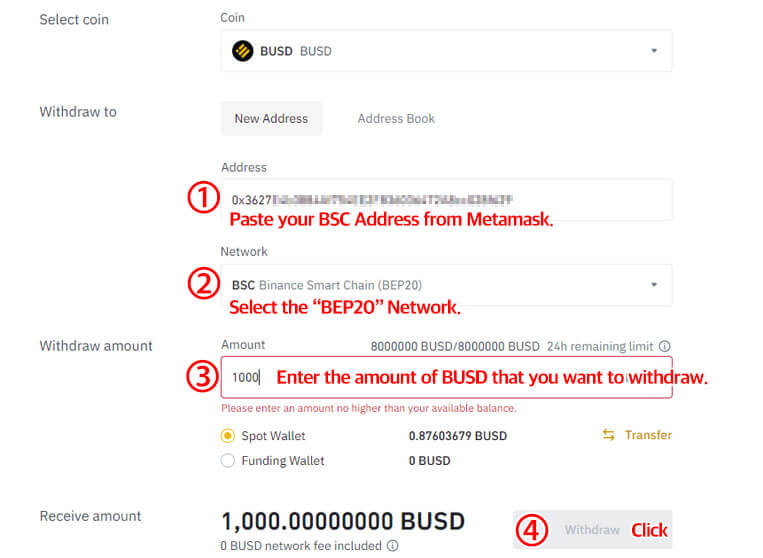
After you’ve clicked on “Withdraw”, you’ll land on the BUSD withdrawal page.
On the page, you’ll see 3 fields including “Address”, “Network”, and “Amount”.
Firstly, make sure that “BUSD” is selected in the “Coin” dropdown box.
If it isn’t click on the “Coin” dropdown box and select “BUSD”.
① Your BSC address from MetaMask into the “Address” field.
② Select the “BEP20” network in the “Network” dropdown box. In most cases, the “BEP20” network will be automatically selected.
③ Enter the amount of BUSD that you want to send to MetaMask in the “Amount” field.
④ Lastly, click on “Withdraw” to withdraw your BUSD. After you’ve clicked on “Withdraw”, you need to complete the security verification. This includes entering a security code that will be sent to your mobile number. Once you’ve completed the security code, the withdrawal process will begin.
Once it’s completed, you’ll see your BUSD balance on MetaMask.
You’ve successfully learned how to send BUSD from Binance to MetaMask!
※ Important: Every transaction that takes place on the BSC chain will incur a very small amount of BNB as a fee. This is called ‘Gas Fee’. We recommend keeping at least $30 worth of BNB or 0.1 BNB to cover gas fees.
※ you need to take note of a couple of things:
- You need to make sure that the address that you’re sending to is correct.
- You need to make sure that the network that you’ve selected is correct.